
 Lower rates in 2026 = higher margins. See what you're savingLower rates in 2026 = higher margins. See what you're saving
Welcome to Selling on Amazon!
First, let's help you list your products so you can start selling. We've put together the following guide to walk you through the product listing process in five steps.

What steps do you need to take?


Step 1
Start with your brand information
If you're a brand owner or a brand representative, Amazon Brand Registry gives you access to a number of tools to help you better represent your brand. This helps protect your intellectual property and creates a familiar experience for customers on Amazon.
If you are an authorised agent, let the trademark owner register the brand and add your account as an additional user.
If you are a reseller and not a brand owner or representative, you can skip directly to Step 2.
If you are an authorised agent, let the trademark owner register the brand and add your account as an additional user.
If you are a reseller and not a brand owner or representative, you can skip directly to Step 2.
Note: If you have an application for trademark registration with Amazon, please wait until the application is completed before listing your products. This is how you ensure that your products are offered under the registered brand.
Why use Amazon Brand Registry?
1. Correct brand representation
- Brand Registry gives you more control over Amazon product pages that use your brand name, so customers almost always see the right information about your brand.
2. Powerful search and reporting tools to protect your brand
- Simplify detecting potential trademark infringements with our customised features such as global search, image search and bulk search for ASINs (Amazon Standard Identification Number) – features designed specifically for brands.
- Take advantage of additional proactive action tools, such as finding product listings that don't accurately represent your trademark. These tools proactively warn you when products are wrongly offered with your brand name, if images include your logo but the products offered are not your brand, etc.
- With Automatic Brand Protection and Project Zero, you can report any infringement to protect your brand. Learn more about Project Zero.
3. Grow your business with Amazon brand owner tools
- Enhanced branded content (EBC)/A+ Content: With EBC (also known as A+ Content), brands can describe product features in new ways by adding a unique brand story, improved images and text placements, which can result in higher conversion rates, more traffic and more sales, when used effectively. More information
- Brand Stores: Stores is a free self-service destination on Amazon where advertisers can create content that inspires, informs customers and helps them discover the brand's product range. Learn how to set up your store (EN) and watch a step-by-step video.
- Sponsored Brands: Sponsored Brands helps customers discover and connect with a brand when they search for products on Amazon, through prominent and customisable, cost-per-click ads. More information
- Amazon Brand Analytics: Amazon Brand Analytics provides valuable insights to improve customer experience, conversion and traffic – all essential for sales success on Amazon. This tool empowers brand owners to make informed, strategic decisions about their product portfolio and marketing/advertising activities. More information
Amazon Brand Registry enrolment criteria
To qualify for Amazon Brand Registry, your brand must have an actively registered trademark in each country you want to register for. Amazon Brand Registry also accepts brands that have pending trademark registration applications with a number of specific trademark authorities. Amazon currently only accepts trademarks issued by the official trademark authorities of the United States, Brazil, Canada, Mexico, Australia, India, Japan, France, Germany, Italy, Turkey, Singapore, Spain, the Netherlands, Saudi Arabia, Sweden, Poland, Egypt, United Kingdom, European Union and United Arab Emirates. If your trademark is registered with the World Intellectual Property Organization (WIPO), enter the number registered with your home country's Intellectual Property Organization instead, as this may be a different number.

Tips!
In order for your brand to be registered for Amazon Brand Registry, it must have a registered trademark (text or image). This is often mistakenly confused with a marketing authorisation certificate. Please make sure you are indeed uploading your trademark registration before continuing! You should also carefully review the country-specific requirements so that your registration with Amazon Brand Registry is as smooth as possible.

Amazon Brand Registry Benefits – Overview of benefits and tools available to strengthen your brand with Amazon

Do you need help?
To learn more about this topic, visit Seller University
Step 2
Check product and category requirements
During this step, you'll verify that you meet the product and category requirements so that your product listings are created correctly. To avoid errors when submitting your product listings, we recommend that you complete this step carefully before creating your products.
2.1. Category requirements
For certain categories and subcategories, Amazon requires that you first obtain approval before you can list products for sale. The approval process may include document requests, performance checks, and other qualifications checks.
To request approval for a product that requires approval and is already in the Amazon catalogue, follow these steps:
1. Go to Catalogue and select Add Products.
2. Search for the item you want to sell.
3. In the search results, click Show Restrictions next to the relevant item.
4. If your product needs approval, click the Request Approval for Sale button in the search results to begin the application process.
Once you've submitted the request, you can track the status in Sales Requests.
2.2 Product ID Requirements
Most products have a unique 12-14 digit identifier, such as a UPC, EAN, JAN or ISBN, also known as a Global Trade Item Number (GTIN). This is a global code for a product. An internal company code is not the same as a GTIN, UPC, EAN, JAN or ISBN. The GTIN provides accurate information on the product page. This is sometimes referred to as the product barcode. If your product does not have a GTIN, you may be eligible to apply for a GTIN exemption. For more information, see here.
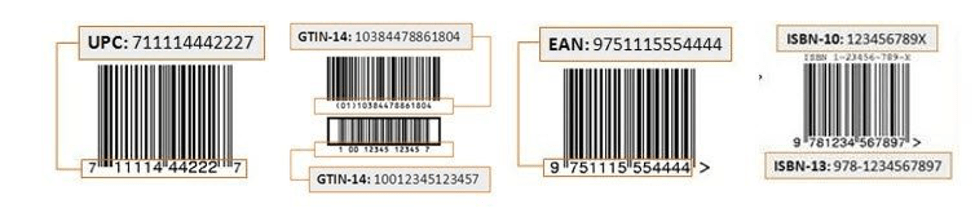
If your products have a GTIN, you can skip to the next step.
Do you need help?
To learn more about this topic, visit Seller University
2.3 Brand Requirements
In some cases, Amazon requires that sellers first obtain permission before listing products for sale for a specific brand.
In the approval process, sellers may be required to provide documents and other qualifications, such as invoices and authorisation documents. Here's how to verify that the brand you want to offer requires approval.
1. Go to Catalogue and select Add Products.
2. Find the brand you want to sell and select a product that looks like the branded item in your catalogue.
3. In the search results, click Show Restrictions next to the item in question to see if approval is required. If the brand is restricted, the message “You need approval to list this brand” appears.
4. Click Request Approval for Sale to begin the application process by submitting the required documents.
Once you've submitted the request, you can track the status in Sales Requests.
If the brand you want to sell isn't restricted, you can skip to Step 3.
Step 3
Choose your fulfilment channel
Fulfilment is the process of storing, packaging and shipping orders as well as handling returns and exchanges. Effective, reliable e-commerce fulfilment ensures satisfied customers. You have the option to use your own fulfilment channel (MFN), or you can use Fulfilment by Amazon (FBA) and let Amazon handle the fulfilment of your products.
As a seller, you can use both fulfilment channels at the same time and choose a different fulfilment channel per product to optimise your business activities.
As a seller, you can use both fulfilment channels at the same time and choose a different fulfilment channel per product to optimise your business activities.
3.1 Sales Partner Fulfilment (MFN)
If you're fulfilling orders yourself, it's important to configure your shipping and return settings before you start listing your products. You can decide which countries and regions you want to ship your products to, what the delivery time is and how much your customers will be charged for it.
Important: Remember that if you sell in more than one store, you need to set shipping settings for each store, separately.
Important: Remember that if you sell in more than one store, you need to set shipping settings for each store, separately.
After you configure your shipping settings, you can set your return address.
3.2 Fulfilment by Amazon (FBA)
Send us as many or as few of your products as you want and when you receive orders from customers, we'll store, pick, package and ship them. We offer customer service in multiple languages and even handle returns on your behalf.
If you enrol in FBA, you can go directly to Step 4 and configure your settings as soon as you finish listing the product.
The benefits of FBA
• Reach Prime customers with Prime badges and get access to additional deal options
• Fulfilment supported by Amazon's trusted 24/7 service
• Fulfilment supported by Amazon's trusted 24/7 service
How does it work?
1. Go to the Manage Inventory page in your seller account.
2. Choose the products you want Amazon to handle.
3. Click Actions and then Change to Fulfilled by Amazon.
4. Visit the Manage FBA Inventory page to create your first shipment. Select your products and click Send/Replenish Inventory.
5. Set up your delivery plan by following the steps (setting the product quantity, preparing products, etc.).
6. Send your shipment to Amazon's fulfilment centre. On the Summary page, you can view the contents of your delivery.
FBA turnover calculator
Enter the fulfilment costs you incur when processing orders by yourself as a seller, and see a real-time comparison of these costs against the costs when using our FBA service.
Disclaimer: The FBA turnover calculator only provides an estimate of the FBA costs. Amazon does not guarantee the accuracy of the information provided or calculations obtained. An independent analysis of the outcome of this FBA turnover calculator must be performed to verify it. Estimates of fulfilment costs by the FBA Revenue Calculator are based solely on the domestic programme. Separate rates apply to items that are enrolled in specialised fulfilment programmes. Refer to the FBA pricing page for current costs. You will find them here.
Disclaimer: The FBA turnover calculator only provides an estimate of the FBA costs. Amazon does not guarantee the accuracy of the information provided or calculations obtained. An independent analysis of the outcome of this FBA turnover calculator must be performed to verify it. Estimates of fulfilment costs by the FBA Revenue Calculator are based solely on the domestic programme. Separate rates apply to items that are enrolled in specialised fulfilment programmes. Refer to the FBA pricing page for current costs. You will find them here.
Do you need help?
For more information about this topic, visit Seller University.
Step 4
Prepare and submit your product listings
Important: If you requested approval for product categories, brands, or GTIN exemption in the previous steps, check in Sales Requests to see if approval/exemption has been granted to prevent errors when submitting your products.
Tip! If no approval has been granted, we do not recommend that you continue with the following steps
There are three different ways to upload your products to the Amazon catalogue. Select the method that best suits your needs and opportunities:
4.1 Bulk upload – ideal for large catalogues
Click Go to bulk product listing, download the template file and fill in the required columns: SKU, Price, EAN Code and Product Condition. Once the file has been completed, upload the file.
The system provides an overview of the products that match existing products in our catalogue. Products that do not yet exist in our catalogue must be created yourself. To do this, generate a template for the specific category and fill in the required information. When you're done, you can upload the file to “Inventory files for specific categories”. To make the fields easier to manage, we recommend that you generate and upload the templates by individual product type rather than for the entire catalogue at once.
Tips!
Always try selecting the Advanced Template option. This allows you to generate a higher quality product page and reach more buyers!
Once uploaded, the system generates a downloadable processing report in the Check Upload Status tab, where you can view the status of the uploaded inventory file.
The processing report includes an overview of the listings (product listings) that were successfully processed and the number of listings that could not be processed (or were processed with errors). You can use this report to make any necessary corrections to your inventory file and then upload the file again to correct your product listings. You can use this report to make any necessary corrections to your inventory file and then upload the file again to correct your product listings.
4.2 Manual upload (submission by product) – ideal for small catalogues
Click Add Product and type the product you want to list in the search bar. If the product already exists in the catalogue, all you have to do is add your listing to it. If the product does not exist yet, you must create the product yourself.
Do you need help?
To learn more about this topic, visit Seller University
4.3: API integration – ideal for large catalogues that require complex automation
If you're considering automating your own catalogue and synchronising it with your Amazon store, you can either use an external developer integration (via the App store for selling partners) or build your own application to automate the exchange of information with Amazon. In addition to automating product listings, these integrations can also help you automate other aspects of your seller account, such as billing, orders, pricing, etc.
Using a third-party integration – discover multiple applications developed by third parties that allow you to automate and optimise various aspects of your seller account, such as creating product listings, creating FBA shipments, billing, pricing automation, etc.
Using a third-party integration – discover multiple applications developed by third parties that allow you to automate and optimise various aspects of your seller account, such as creating product listings, creating FBA shipments, billing, pricing automation, etc.
Building your own integration – you have the opportunity to custom develop your own integration that better meets your needs. Please note that this option requires technical knowledge and certain IT capabilities.
Do you need help?
For more information on this topic, visit the API Selling Partner Guide
4.4: International product listing tool (BIL tool) – to replicate existing product listings in a new store
With the BIL tool, you can create and update listings for a single source store and duplicate edits for one or more target stores. You save time and effort by easily managing your listings in one store. From your source store, the tool updates eligible offers and prices in target stores based on the settings you specify and the exchange rate. The BIL tool performs the following automatic tasks:
- Replicates listings from a source store to a target store where the same ASINs already exist in both stores.
- Tries to translate product pages and create them in a target store.
- Synchronises offer prices in target stores based on the price you've set in the source store and your pricing rules.
- Adjust prices periodically to reflect exchange rate fluctuations in target retailers' currencies. The frequency of these updates may vary from daily to weekly. These updates do not reflect changes of less than 1%.
- Adds or removes listings in target stores when you make changes to eligible ASINs in the source store.
Write product titles that rank in search results
A well-structured product title on Amazon NL has a direct influence on how Amazon indexes your listing and how quickly a buyer recognizes your product in search results. The strongest titles start with the brand name and primary keyword in the first few words, because search results on mobile devices truncate titles early. By putting the most important information first, your product remains recognisable even when the full title is not visible.
A fixed title structure helps Amazon link your listing to the right customer searches and supports accurate category indexing. A reliable order to follow is: brand name, product name or model, key features such as material or size, size or quantity and colour or variant, where applicable. Including specific features such as packaging content or compatibility directly in the title reduces ambiguity for buyers who know exactly what they're looking for, reducing the risk of incorrect clicks.
Amazon's style guidelines prohibit promotional language such as price claims, superlatives or subjective descriptions in product titles. Sellers who use prohibited phrases run the risk of having their listings suppressed. Always use digits instead of written numbers, capitalise the first letter of each main word and make sure the title is factually correct. Refer to Seller Central for category-specific character limits and formatting guidelines, as they vary by product type.
Step 5
Frequently Asked Questions

I've followed all the steps but I'm still getting an error. What should I do?
For troubleshooting tips, see our error code explanation guide. For more information, select the appropriate error code in the panel on the left. Read more information here.
The most common error codes are: Error 8541, 8542, 13013, 6039, 6024 and 20000. This link contains the information you need to resolve your issues and tips for any other error codes you may encounter.
You can also visit Amazon Seller University's YouTube page. Here are step-by-step instructions for fixing common errors.
Error 5461 Error 5665
Please also refer to our ASIN Creation Policy, Brand Name Policy and Replication Error Code Guide for further troubleshooting assistance.
Remember, you can always contact us and ask for support!
Can I edit prices and product quantity after listing my products?
Yes, you can edit the price and number of products via your Seller Central account.
How do I remove a product from my inventory?
1. Sign in to your Seller Central account.
2. Select Manage Inventory.
3. Next to your product information, you'll find an arrow with a drop-down menu, select “Delete Product and Product Listing” from the list.
2. Select Manage Inventory.
3. Next to your product information, you'll find an arrow with a drop-down menu, select “Delete Product and Product Listing” from the list.
Which product categories require approval on Amazon Netherlands?
Some product categories on Amazon Netherlands require prior approval to ensure that products comply with applicable safety standards, quality guidelines and Amazon policies.
This can apply to, among others:
1. Food and beverages
2. Cosmetics and personal care products
3. Health and household items, including food supplements
4. Medical devices and health products
5. Jewellery and watches
6. Car parts and accessories
7. Electronics and related accessories
8. Toys and games
9. Baby products
10. Large and small kitchen appliances
11. Sports and outdoor gear
12. Pet supplies
13. Specific brand, collectable, used, or refurbished products
For these categories, Amazon may request additional documentation, such as invoices, certificates or proof of product compliance.
Before you start selling in restricted categories, it may be helpful to review the Beginner's Guide to Selling on Amazon to better understand product requirements and sales guidelines.
What structure should an Amazon NL product title follow to improve search visibility?
An effective Amazon NL product title follows a fixed order: brand name, product name or model, as well as key features such as material or size and any variants such as colour or packaging content. Put key terms in the first few words so that the listing remains recognisable on mobile devices where titles are truncated. Avoid promotional language, use digits for numbers and check Seller Central for the character limit that applies to your specific product category.
How do I optimise my product listings on Amazon Netherlands?
Good product listing optimisation on Amazon helps to increase product visibility and provide customers with the information they need to make a purchase decision. A strong product listing combines relevant keywords with clear, accurate, and engaging content.
To improve a product listing, it's important to use a descriptive title, add clear images, and write informative bullet points and product descriptions that highlight key features and benefits. By regularly updating product information and aligning it with customer search intention, sellers can further improve the performance of their listings.
A well-optimised Amazon product detail page can contribute to better visibility, more clicks, and higher conversion.
Brands that want to further improve their product content can also find more information about the Amazon Brand Registry.


On this site, we use cookies and similar tools (collectively, "cookies") to provide and improve services to you and to show ads. To learn more about how Amazon uses cookies, please read the Amazon Cookies Notice.
